-
System Requirements
For the application to function correctly PHP version 5 or newer is required and a MySQL 5.2 or newer database. Browsers starting with IE9 and newer are supported.
-
Installation
After downloading all the files, copy and upload the
livechatdirectory anywhere on your web server (for example to the root directory of your website).livechatfolder contains all of the necessary files (configuration, scripts, data and resources).If you're using a CMS system or shoping software (like WordPress, Joomla, etc.) copy this folder to the root directory of your CMS.
Update file permissions
This section is only important if your web server doesn't allow PHP to access/edit files by default.The following files/directories should be both readable and writable by PHP:
- whole
/datafolder, - whole
/uploadfolder + its subfolders, /php/config/app.settings.phpfile,/php/config/parameters.phpfile.
Run installation wizard
Visit the following URL:
<your_web_server_url>/<livechat_dir>/php/app.phpWhen application is accessed for the first time, you will be redirected to the installation wizard:
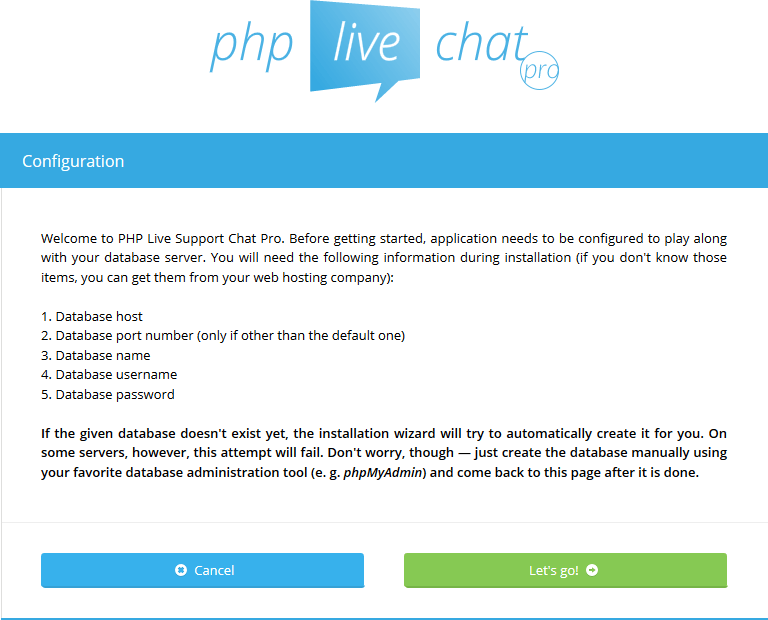
Following the instruction, click
Let's go!. The below page will be displayed next:
Fill the form with your settings and click
Save. The next page will be: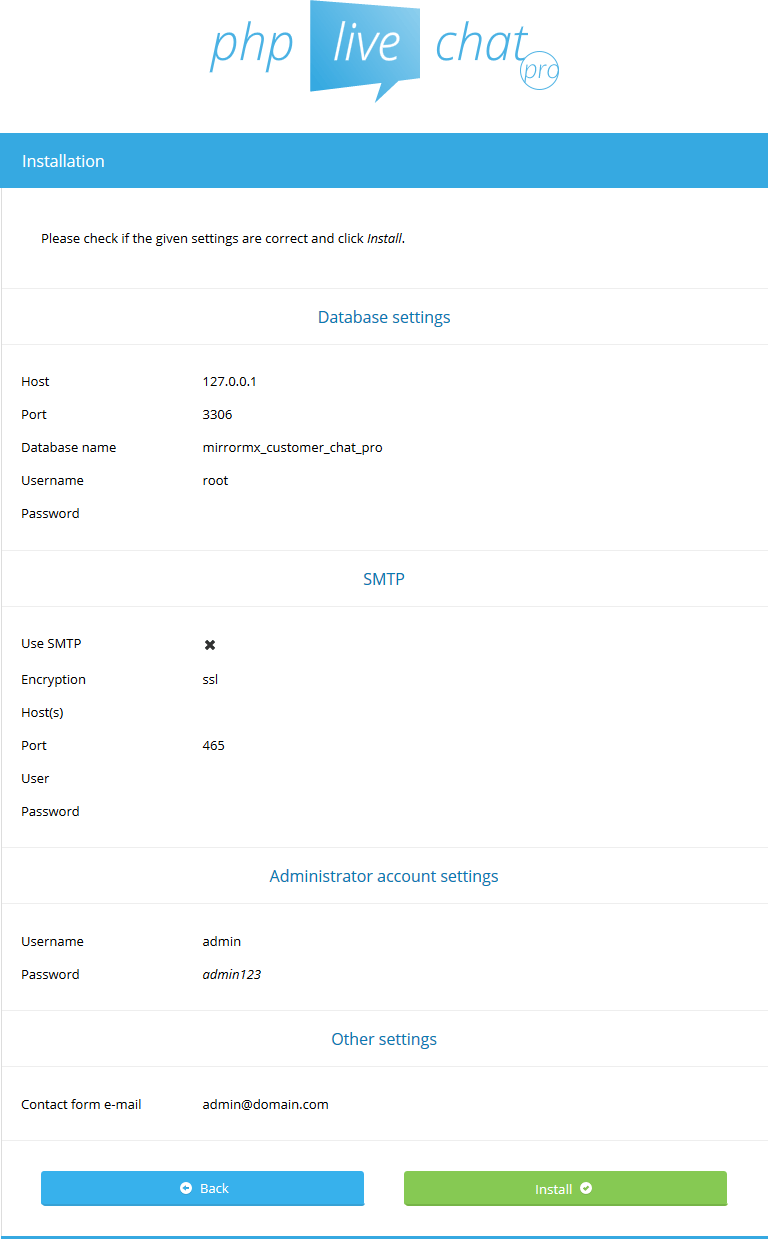
Here, check your submitted data and confirm using the
Installbutton. If everything went well, the final page will be displayed: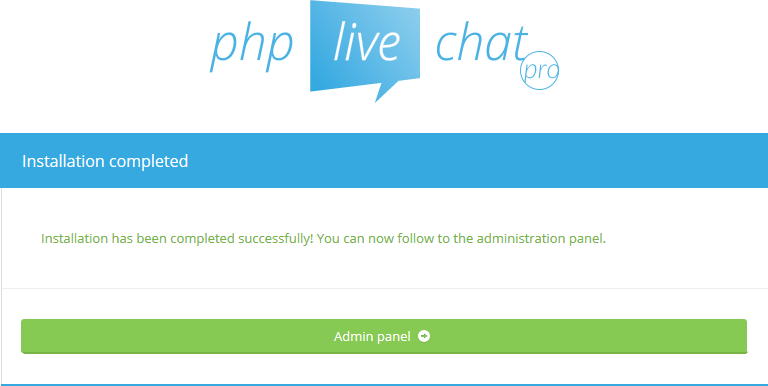
Add chat widget to your web page
Now you're ready to embed the chat widget on your website. To do that you have to add a special line of code in your main HTML document/layout. To get this code snippet go back to admin panel (
<your_web_server_url>/<livechat_dir>/php/app.php?login) and selectGet widget scriptfrom the top right menu. This will display a message dialog with the code to copy: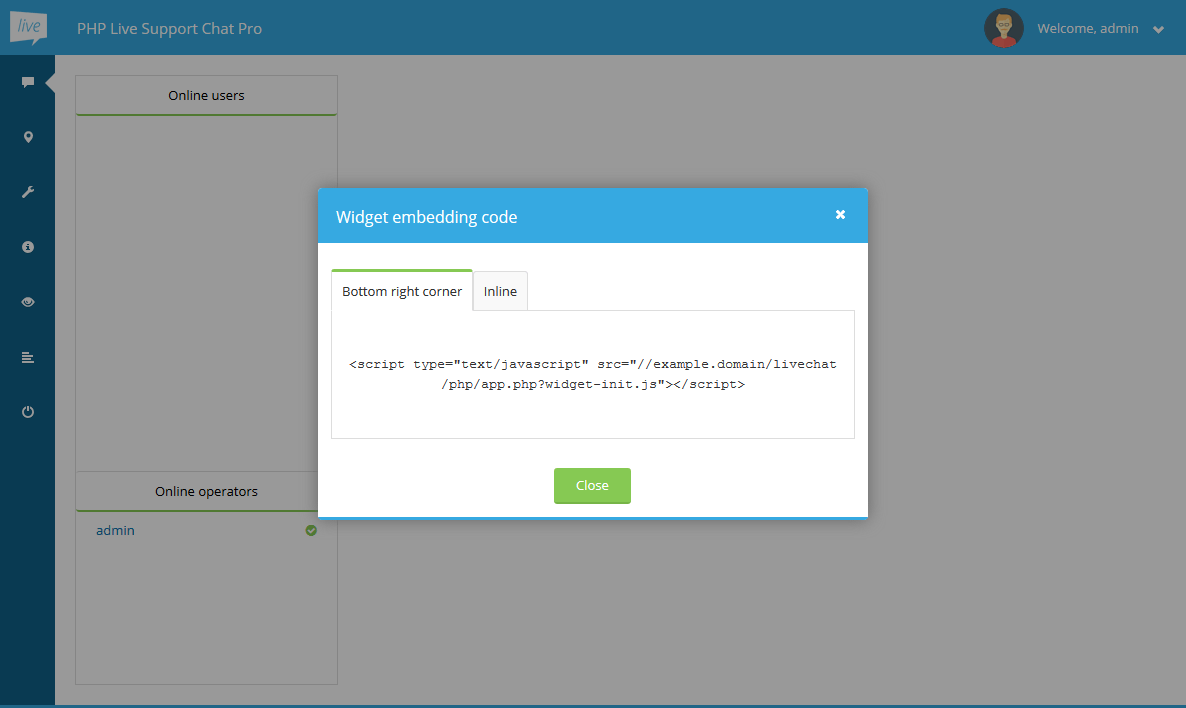
Application allows to display the widget in two ways - in the corner of the window or inline. Inline version means the widget will be displayed in the same place where embedding code is pasted. This way you can embed the widget anywhere within your page's layout. Select appropriate version and copy the code.
Paste it in the
headsection of your website or at the end of thebodytag and that's all. This script will load all the dependencies and add the chat widget to your website. Now, when you visit the site, it should show the widget with contact form displayed in it (as no operators are available online yet). - whole
-
Uninstallation
You can uninstall the application from the server using the uninstallation page. Just select
Uninstallfrom the top right menu. The following page will be displayed: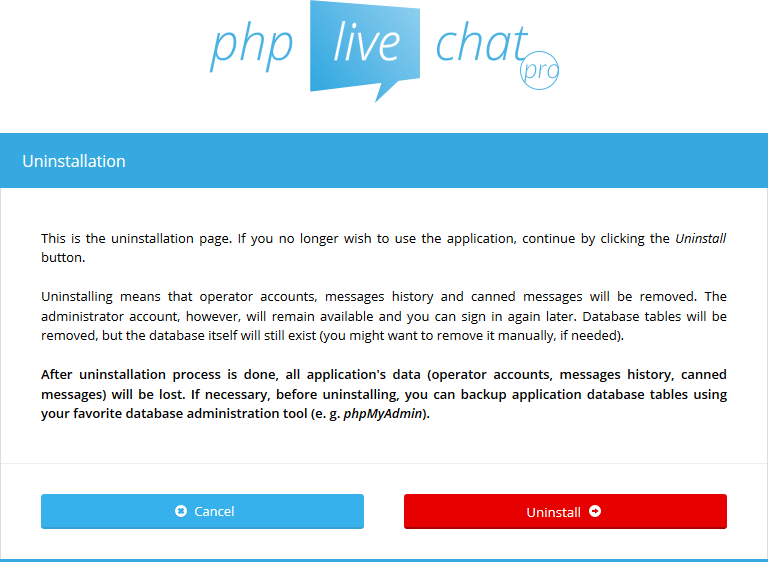
After clicking the
Uninstallbutton, the application will be uninstalled and you will see the following message:
-
WordPress Installation
To install the chat on a WordPress website follow the same steps described above for usual installation. Only remember at the last step that the chat widget should be embedded in the main layout file (so it's available in any section of the website). To make this task simple for you, you can use the
Per page add to headWordPress plugin (http://wordpress.org/plugins/per-page-add-to/), which allows you to insert additional content to theheadsection of your website. After installing the plugin and turning it on, go toSettings/Add <head> to every pagein you WP admin panel, paste the widget embedding snippet (look at the previous section to see where to get it from) into the text area and clickSave. Next time you visit any page of your WordPress site, the widget should be visible in its bottom right corner. -
Joomla Installation
To install the chat on a Joomla website follow the same steps described above for usual installation. Only remember at the last step that the chat widget should be embedded in the main layout file (so it's available in any section of the website). To make this task simple for you, you can use the
EasyScriptJoomla plugin (http://extensions.joomla.org/extensions/core-enhancements/coding-a-scripts-integration/head-code/11936/), which allows you to insert additional content to theheadsection of your website. After installing the plugin and turning it on, go toExtensions/Plugin Manager, select EasyScript plugin from the list in, display theOthertab in its settings and paste the widget embedding snippet (look at the previous section to see where to get it from) into theAdditional itemstext area. Finally click theSavebutton. Next time you visit any page of your Joomla site, the widget should be visible in its bottom right corner. -
Drupal Installation
To install the chat on a Drupal website follow the same steps described above for usual installation. Only remember at the last step that the chat widget should be embedded in the main layout file (so it's available in any section of the website). To make this task simple for you, you can use the
Add To HeadDrupal module (https://drupal.org/project/add_to_head), which allows you to insert additional content to theheadsection of your website. After installing the module and turning it on, go toModules, find Add to Head module on the list and clickConfigurenext to it. In the window that displays chooseAdd another profile. The form will display. Name the entry however you'd like to and paste the widget embedding snippet (look at the previous section to see where to get it from) into theCodetext area. You can also fill in the included/excluded path using thePathstext area and set the script to be placed in Head or Scripts section using theScope of additionradio buttons (Scripts section will most probably be the best option). Finally click theSavebutton. Next time you visit any page of your Drupal site, the widget should be visible in its bottom right corner. -
OpenCart Installation
To install the chat on a Drupal website follow the same steps described above for usual installation. Only remember at the last step that the chat widget should be embedded in the main layout (so it's available in any section of the website). To make this task simple for you, you can use the
Add To HeadOpenCart module (http://www.opencart.com/index.php?route=extension/extension/info&extension_id=11171), which allows you to insert additional content to theheadsection of your website. After installing the module and turning it on, go toExtensions/Modules, find Add to Head module on the list and clickEditnext to it. In the page that displays clickAdd Moduleto create a file entry. The form will display. Select theJavascript (js)in theFile typeinput and and paste file path part of the widget embedding snippet (look at the previous section to see where to get it from) into theFile pathtext input. The file path part means you should only use the embedding snippetsrcattribute's value here (and not the whole widget snippet).For example, if the snippet looks like this:
<script type="text/javascript" src="http://example.domain/livechat/php/app.php?widget-init.js"></script>
You should only copy the
http://example.domain/livechat/php/app.php?widget-init.jstext and use it in theAdd to Headconfiguration.After adding the first entry in the module, repeat the process adding additional entries for as many site sections you'd like the widget to appear on. First add the entry as previously described and after that select another page type from the
Layoutinput. Add as many entries as there's layout types available (so the widget is present everywhere).Finally click the
Savebutton. Next time you visit mentioned pages of your OpenCart website, the widget should be visible in the bottom right corner. -
Usage
There are 3 user types in the application: admin, operators and guests. Admin is the user that can run (un)installation, change global settings, manage operators and browse chatting history, but is not allowed to chat. Operators can chat with online guests and once at least a single operator logs in, chat widget won't display the contact form no more - guest login form will be displayed. Operators are also allowed to change their profile data and browse chat history. Guests are the visitors to your website that log in through the chat widget and talk with operators.
Logging in
To login to the chat always use the
<your_web_server_url>/<livechat_dir>/php/app.php?loginpath for both admin account and operator accounts. For admin account useadmin(or other, if you changed the default name in the installation wizard) as the login and for operators use their e-mail addresses as the login.Logging out
To log out from the chat open the top right menu and click the
Logoutitem.Global settings
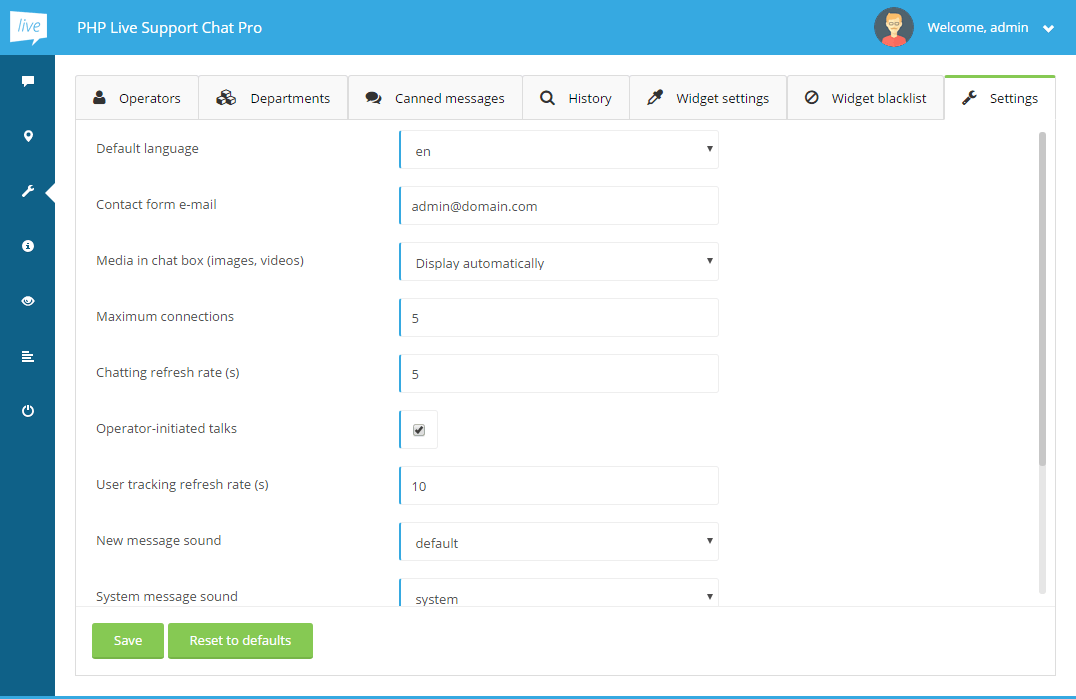
To change application settings log in using the admin account and go to the settings section using the wrench icon on the left. Inside the
Settingstab, a form with multiple configuration options will be displayed, where you can update such options as: default language, contact e-mail, performance and sound settings. While most of the settings are self explanatory, the following require a little clarification:-
Media in the chat box (images, videos)- defines whether application should automatically convert links into image and video elements. You can use one of the following values:-
Display automatically- causes images and videos to be displayed automatically as shown below.
-
Display when clicked- converts links into elements that can be clicked in order to show images and videos as shown below. You can use this option in case you don't want media to be downloaded and displayed automatically, but still be able to easily show them.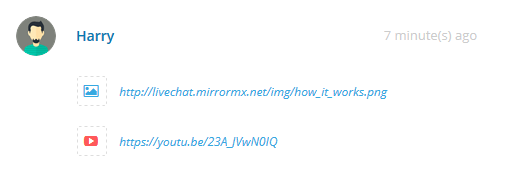
Turn off- causes plain links to be displayed.
-
-
Maximum connections- this option specifies the number of maximum guest chats opened simultaneously. For example, if the value is 10 the 10 visitors will be able to chat with operators at the same time. This feature can help you reduce your server's power usage or adjust the maximum number of chats based on how many simultaneous talks you can handle. Guests that visit your page while the limit is met will be presented with the contact form view instead of the chat view. After currently chatting guests leave the chat, new visitors will be able to connect. -
Chatting refresh rate (s)- defines how often (in seconds) Ajax requests are sent to the server when chatting. Smaller values for this setting will make the chat more responsive. Higher values can help reduce your server's power usage. -
Operator-initiated talks- specifies whether application should track all online users of your website (not only chatting users) and allow operators to invite them to talk. If your website has a very high number of visitors online at the same time, you could disable this feature to reduce server's power usage. -
User tracking refresh rate (s)- defines how often (in seconds) Ajax requests are sent to the server when tracking all website users. This setting is only applicable ifOperator-initiated talksis enabled. Smaller values for this setting will make operator-initiation of the chats more responsive. Higher values can help reduce your server's power usage. -
Google Maps API key- specifies API key used to display a Google Map with chatting visitors. In order to display the map, you need to generate your own API key. You can find API key generation instructions here: Get API Key.
This section is only available if logged in as the admin user.
Widget settings

To change widget settings log in using the admin account and go to the settings section using the wrench icon on the left. Inside the
Widget settingstab, a form with multiple configuration options will be displayed, where you can update such options as: widget's theme, colors, display side or widget's size. While most of the settings are self explanatory, the following require a little clarification:Hide when offline- checking this option will cause the chat widget not to be shown in case no operator is available online.Show widget automatically- defines whether the widget should be automatically opened after given time (without the visitor clicking it).Show widget automatically after (seconds)- specifies the number of seconds after which widget should be automatically opened.Mobile version breakpoint- This is the widget's containing page width in pixels below which mobile version of the widget is used. In other words - if containing page is smaller than this value, standard widget will be hidden and its mobile version will be used.
Widget blacklist
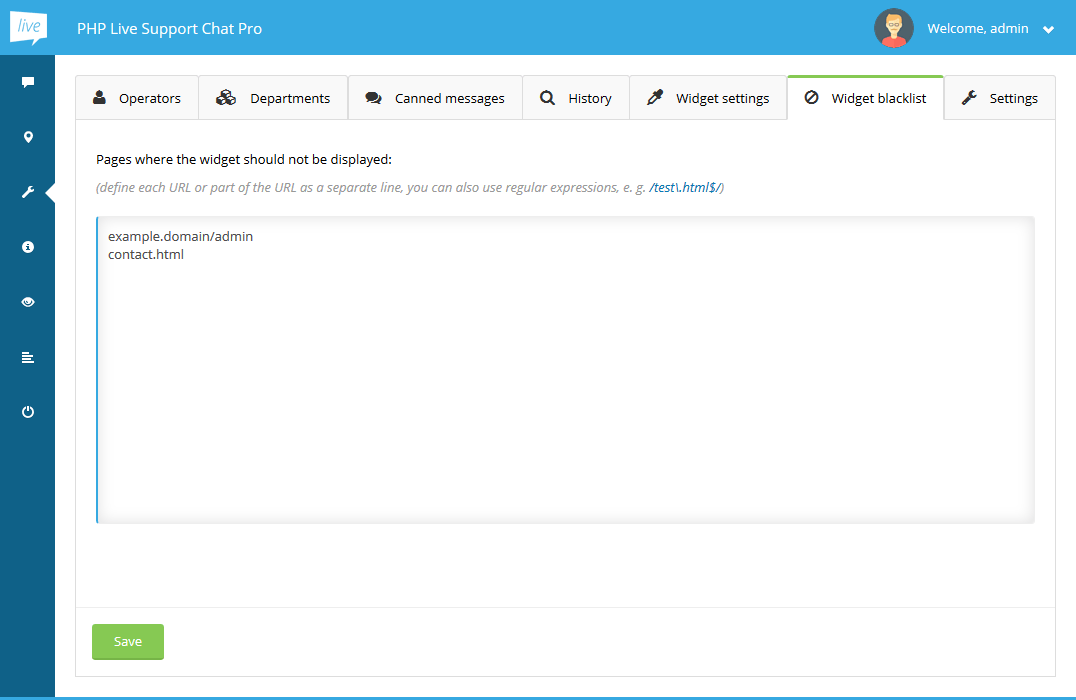
When widget embedding code is pasted into base template of a website, it becomes visible on each and every page of this website. However, there might be sections of your website where you wouldn't like the widget to be displayed. In such case, you can list those locations inside the
Widget blacklisttab. You can use full URL addresses or define only significant parts of those URLs. Additionally, by enclosing your expressions in slash (/) characters, you will instruct the application to treat them as regular expressions. Each location should be defined in a separate line. After specifying all locations, clickSaveand the next time a page matching one of the lines is visited, it will no more have the widget displayed.Widget preview
Operators and administrator can preview the chatting widget at any moment by clicking the
Widget previewitem in the top-right menu (or eye icon on the left menu). This will result in opening the below page in a new browser tab. There, you can test widget's look and behavior: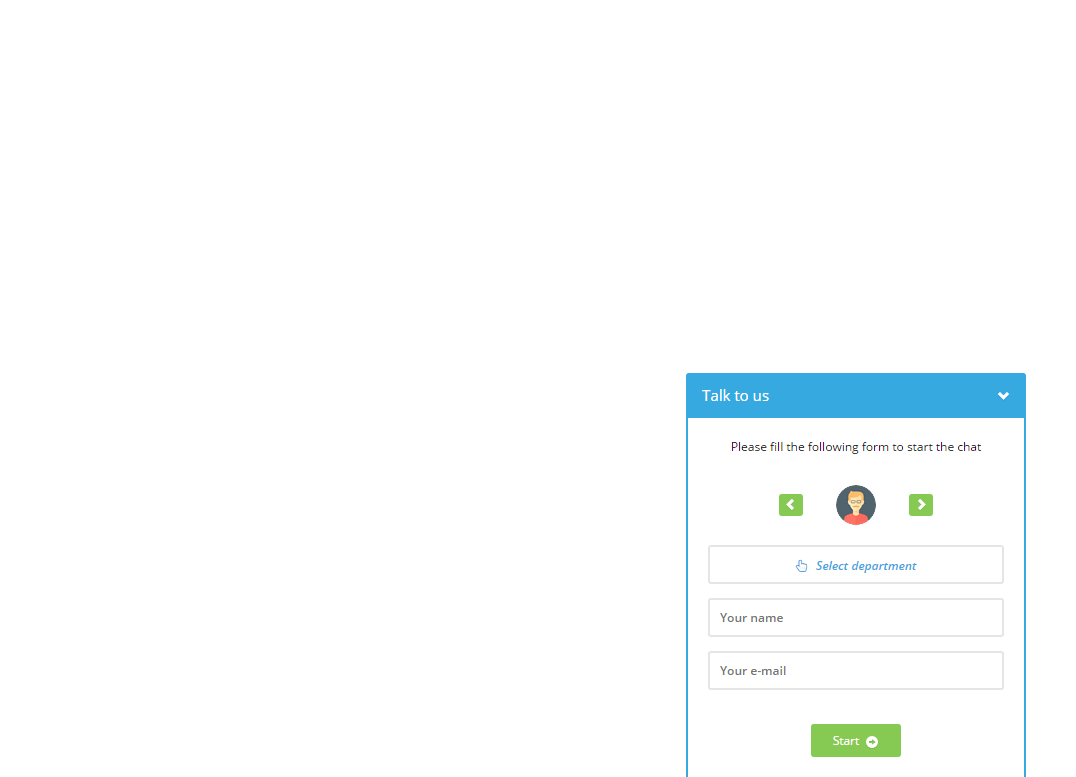
Departments
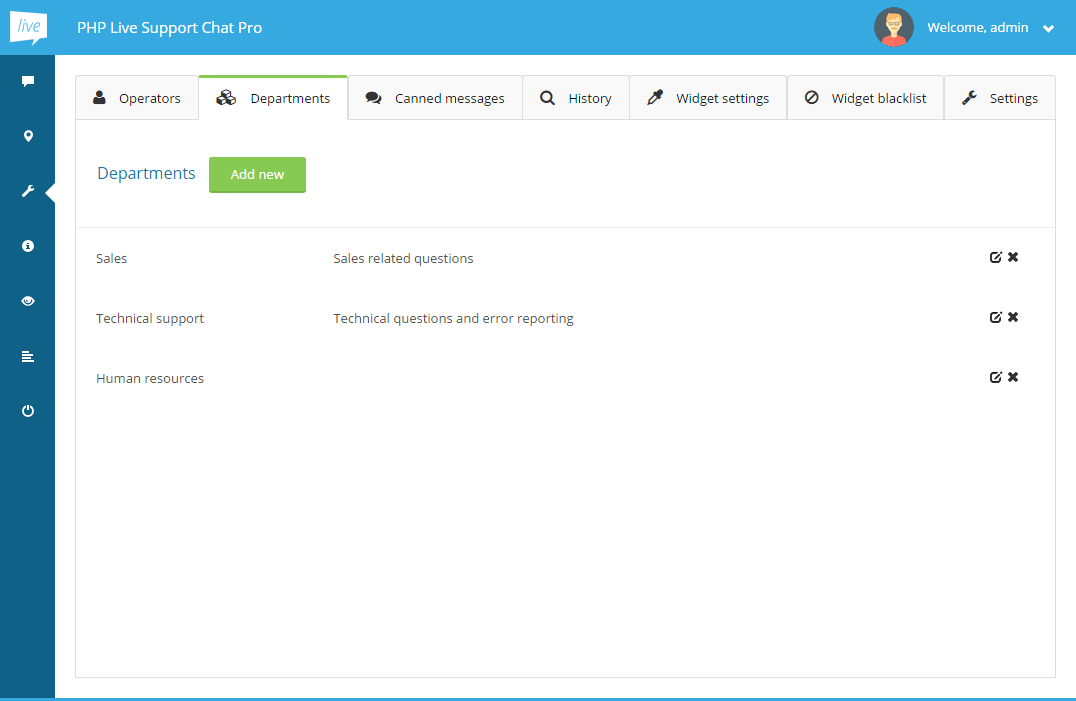
Departmentstab is used to manage all of the departments. You can add, remove or modify the departments here.To create a department go to
Departmentstab and clickAdd newbutton at the top. The following form will be shown: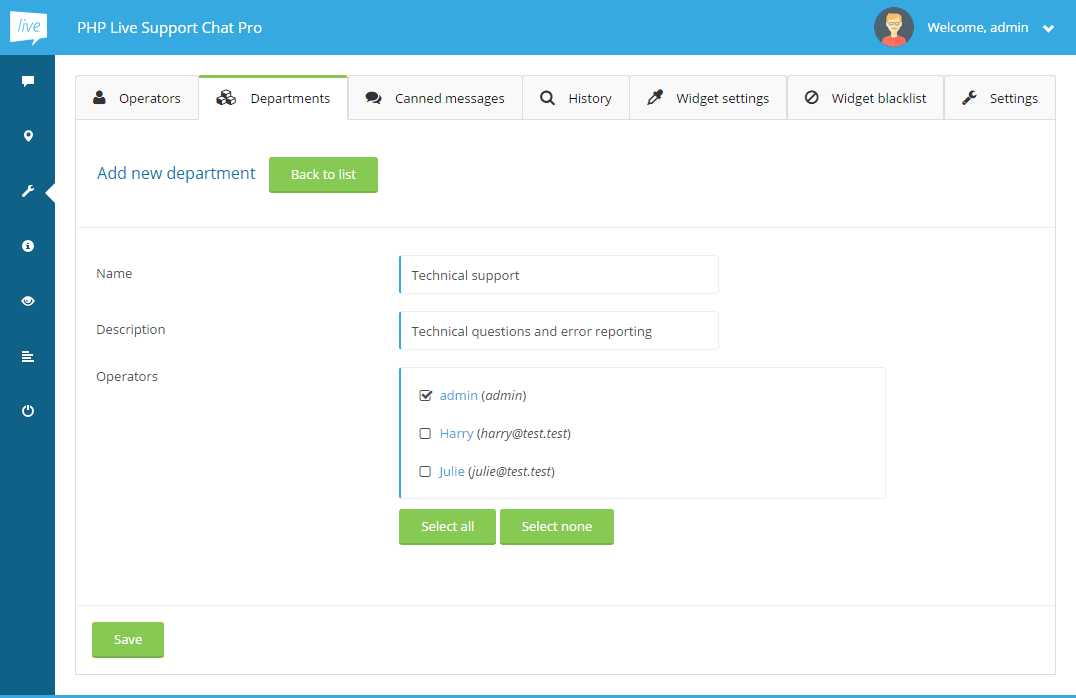
Fill the form with the department's data, select the operators you would like to be assigned to this department and click
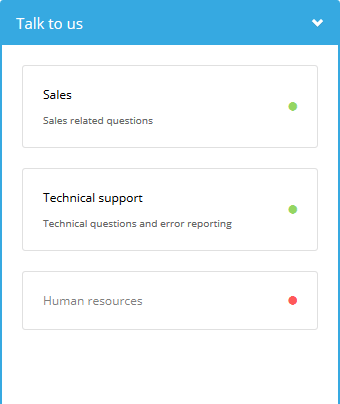
Save.After creating at least one department, visitors of your website will be required to select a department when starting the talk. In case no departments are defined or online operator isn't assigned to any department, department selection will be hidden. Department selection view can be seen below. Online departments are listed first and marked with a green bullet on the right. Offline departments are marked with red bullet and aren't clickable.
When guest selects a departments for his talk, new messages will be delivered only to those operators that are members of the given department. Such talk can still be accessed by operator from other department if he manually clicks on the visitor's name in the
Online userslist or gets invited to the talk by another operator.Operators
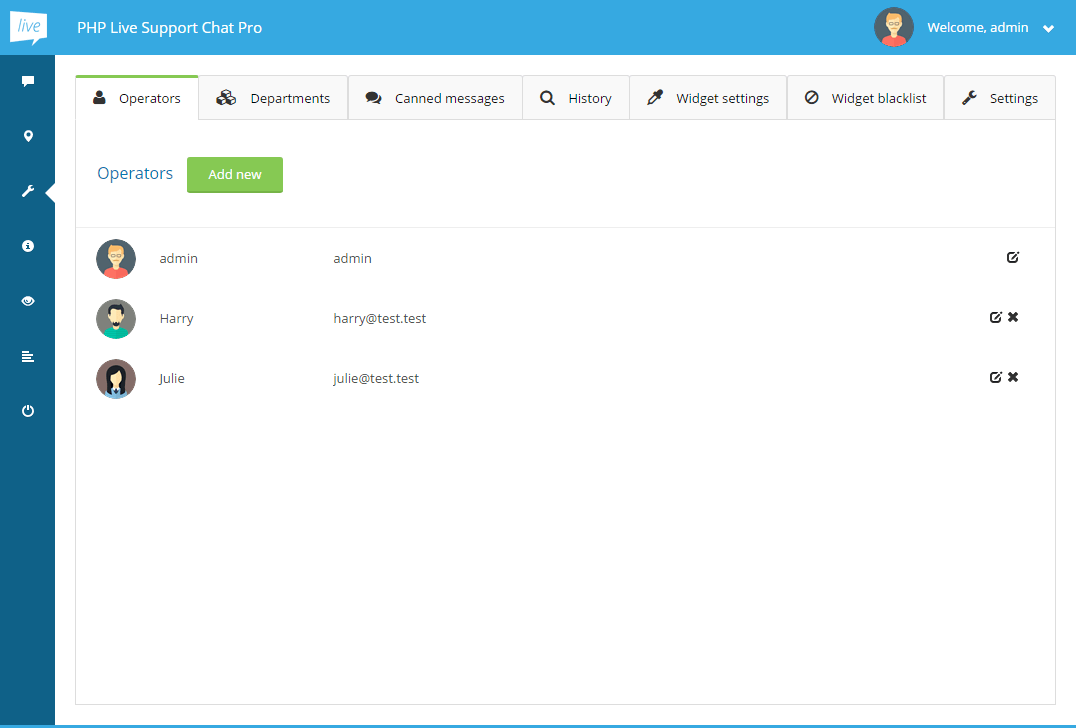
Operatorstab is used to manage all of the operators. You can add, remove or modify the users here. If you're logged in as an operator, you can only change your own profile information. Additionally, passwords can be reset here and profile avatars selected/uploaded.To create an operator go to
Operatorstab and clickAdd newbutton at the top. The following form will be shown: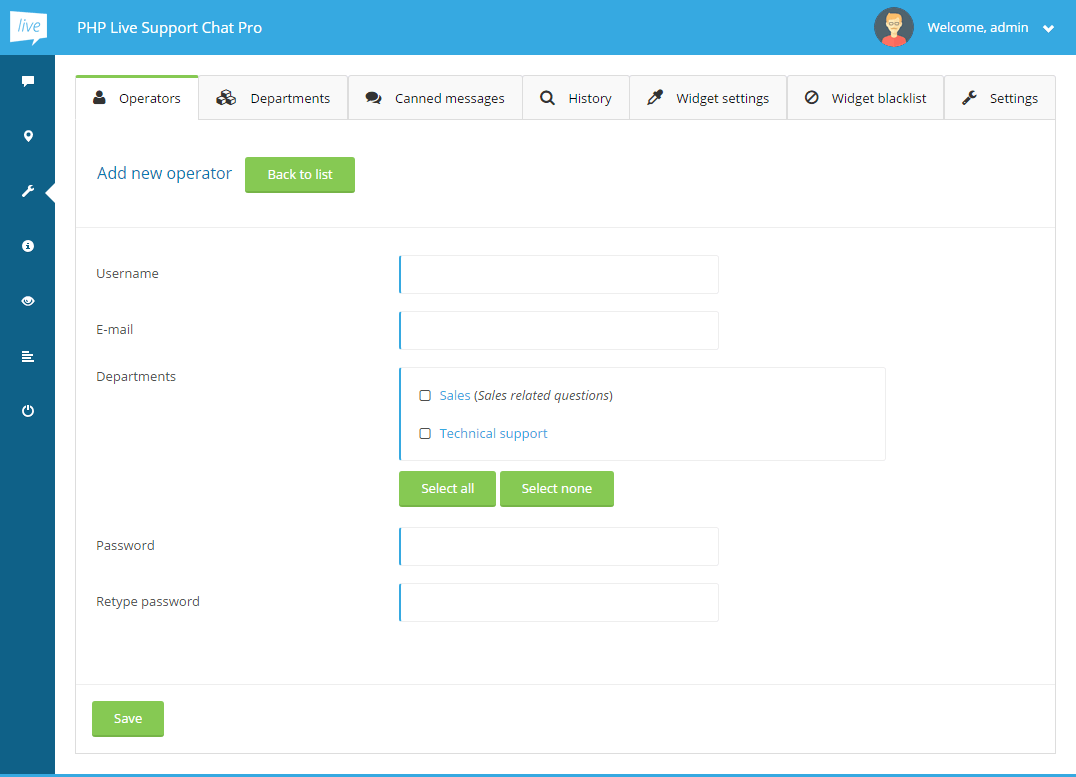
Fill the form with the operator's data and click
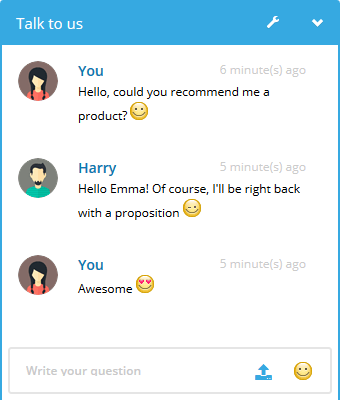
Save. The e-mail address you specify here will be used to log in with this operator's account. Important: thePasswordfield has to be filled with at least 6 characters.Chatting
For your visitors to be able to chat you have to be logged as an operator. Otherwise, the guests will only see a contact form fallback and not the chat login form.
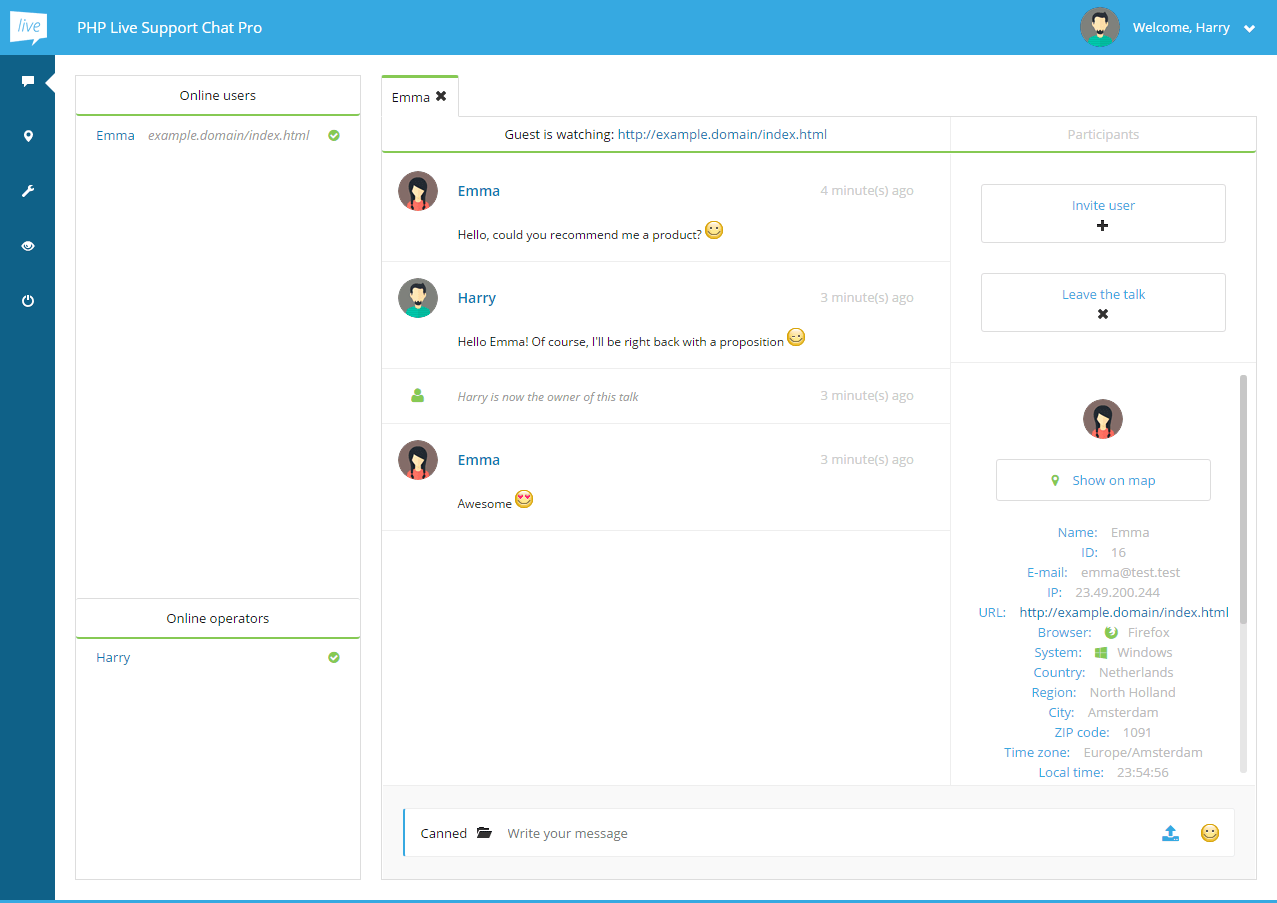
The default section that's displayed after logging in as an operator is the chat view. All online users are listed on the left here (
Online usersandOnline operatorslists). If you move your mouse cursor over a user's name, you'll see a small pop-up with information about that user. You can either wait for incomming messages or click on the user's name and start a conversation yourself. When new messages arrive operators are notified with sound as well as blinking envelope icons next to the tab headers. After opening user's tab you can type your messages into the input on the bottom (Write your message) and press enter to send them. You can also use emoticons by clicking their symbol on the right of the input.When talking with a guest, on top of the chat's view there's a live status of the page guest is currently visiting. Additionally, on the right side a detailed list of the talk's participants is displayed with informations such as: IP address, browser, operating system, geolocation and more.
Conversations between two operators are also possible - just click operator's name on the list of online operators.
Inviting another operator to talk
While talking with a guest, you can invite another operator to join the same chat using the
Invite userbutton on the right of the chat box. This will display a pop-up window where you can select which of the online operators to invite. After accepting the decision, the other operator will receive a message and the talk will be displayed to him.Leaving a talk
You can leave a talk using the
Leave the talkbutton on the right of the chat box. After leaving a talk, you will no more be notified of new messages inside it.Talk transfering and closing
If you're the owner of a given talk and you'd like to leave it, you can either end the talk or transfer it to another operator. Talk owners will see an extended version of the pop-up after clicking
Leave the talkbutton. UseEnd the talkbutton to close the chat orTransfer and leavebutton to transfer the ownership to selected operator and leave the chat.Operator-initiated chats
When
Operator-initiated talkssetting is enabled, all visitors of the website are tracked and displayed in theOnline userslist. Guests that aren't currently chatting are marked with a blue question mark icon on the right. Such user can be invited to talk by clicking on his name. Confirm the decision in the pop-up that shows up and after a while (depending on yourUser tracking refresh rate (s)setting) guest will be fully logged in. This will be marked with a green checkmark on the right of his name. Another click on the user will open the chat box.File sharing
When
File sharingsetting is enabled, any user (both guest and operator) will be able to send files in the chat box. This can be done by clicking the blue upload icon next to the message input and selecting the files or by dragging one or more files into the chat box.Operators will send files immediately after selecting them. Guests, on the other hand, will require an operator's permission for their file transfer.
Map
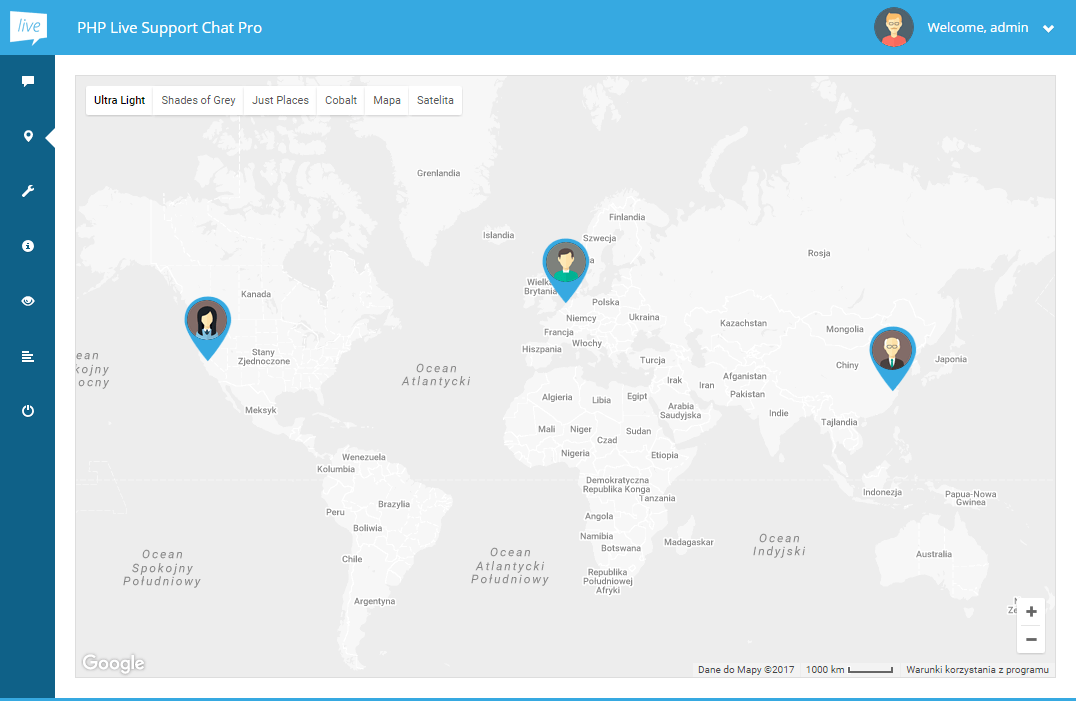
To display a map with all currently chatting visitors click the map marker icon on the left. Guests are represented on the map as markers containing their avatars. You can click on the marker to show the talk of the given user.
Important: Before using the map for the first time you need to fill the
Google Maps API keyitem in theSettingstab. You can find API key generation instructions here: Get API Key.Guest chatting
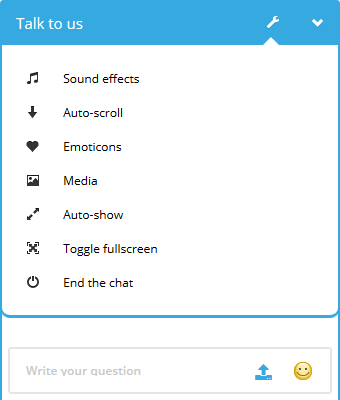
Guest chatting works in exactly the same way. Additionally, while chatting, guests can access a settings menu using the wrench icon on the title bar to update settings like emoticons usage, sound notification usage, auto scrolling the chat box and auto showing of the chat.
If a guest refreshes the web page, which holds the chat widget, he is still allowed to talk using the same session and any previous messages are displayed in the chat box.
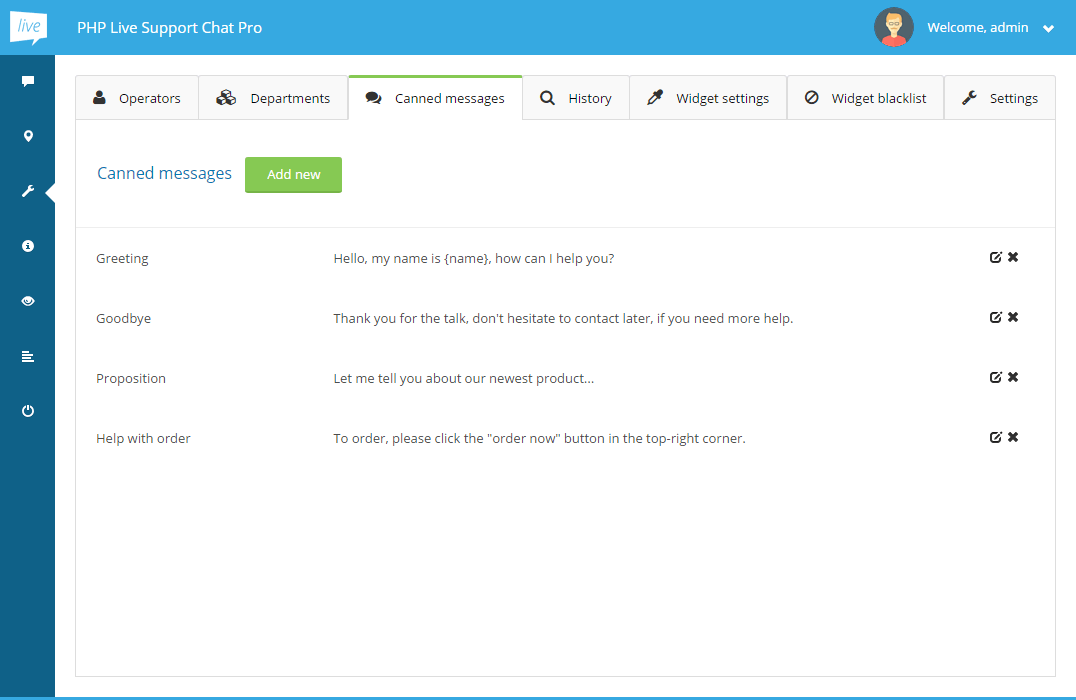
Canned messages
The application allows you to create a list of messages that can be quickly pasted into conversation with a visitor. You can manage them inside the
Canned messages(only when logged in as the administrator user).Important: You can use dynamic placeholders inside the canned message body. The following placeholders are available:
{name}- when operator uses the message it will be replaced by his actual name{mail}- when operator uses the message it will be replaced by his actual e-mail address
To use canned messages, click the
Cannedbutton (on the left of the message input field) when talking to a guest. The following pop-up window will be displayed: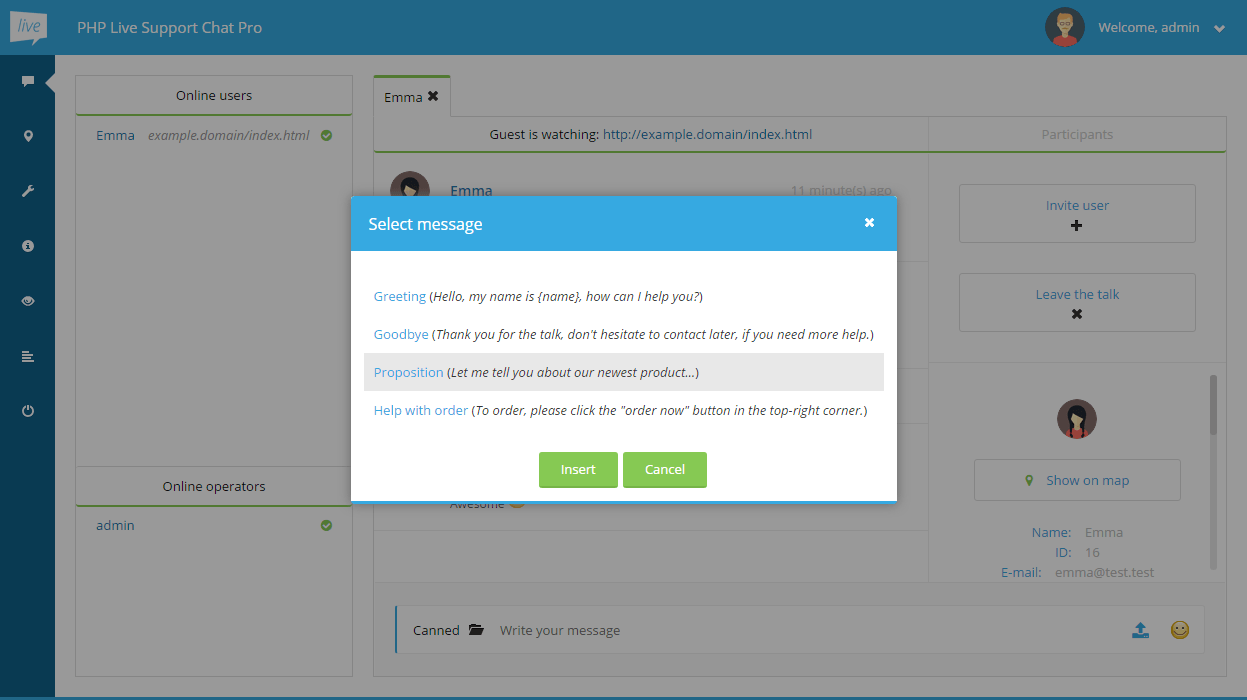
First select one of the messages by clicking on its text. Next, press
Insertand the message will be placed inside your message input.History

History section allows both admin and operators to browse and search through the whole conversation history. Leaving all of the filtering inputs empty will result in all of the talks being listed. To show a given conversation after it's found click the item on the results list under the search form and the talk will be displayed on the right. In the talk's view you can also see its participants profile information and talk's start/end date and time.
Important: If you notice the application slowing down, you might try clearing the history of messages by clicking
Clear history.Translation
Application supports full translation of the widget and administration dashboard. Translations are stored in PHP files, one for each language, inside
livechat/php/config/langdirectory. File names are ISO language codes followed by.phpextension. Application automatically finds, which language code to use and loads corresponding translation file. Language code is determined from the values listed below (following the given order)._langGET/POST variable (if defined),Accept-Languageheader sent by the browser (if defined),- and
Default languagesetting.
_langrequest variable is defined, its value will be used as the language code. If it isn't present,Accept-LanguageHTTP header's value will be used. In case header is missing too, language code from theDefault languagesetting will be utilized. In case any of the above doesn't contain valid code or corresponding language file doesn't exist, next value in the list will be used. Finally, if language code can't be determined,encode will be assigned as a fallback.Modifying language file
To change any of the texts (in either widget or administration panel), open appropriate language file in a text editor. File contains a set of key-value pairs of the following format:
'key' => 'value',
Keys are used by the application to reference particular translations and should not be changed. Values are translations themselves and you're free to modify them. For example, if you'd like to modify the title of the widget displayed when operators are online, change the value of'chatHeader'entry from:'chatHeader' => 'Talk to us',
to something else, for example:'chatHeader' => 'Need help?',
After that save the file and the next time you refresh the browser, new translation will be used.Language files are organized such that widget-related translation are listed at the top (because those are most likely to be changed). Administration panel entries are defined next.
Adding new language
To add a new language, first find what language code is associated with it. Here are a few examples of languages and their ISO language codes:
- English -
en, - German -
de, - Chinese -
zh.
livechat/php/config/langfolder. Its name should be a lower-case language code followed by the.phpextension, for examplezh.php. Copy the content ofen.phptranslation file into it (so it contains all translations), modify the texts you need and save it. Now the application will be able to use this language. If you'd also like to set that language as the default one, access theSettingstab and select it from theDefault languagelist.Forcing particular language use
If you don't want the application to automatically determine the language, you can force the use of particular language with the GET/POST
_langvariable. For example, if you'd like the widget to always display Chinese, add_langvariable withzhvalue at the end of the widget embedding code's URL:<script type="text/javascript" src="//example.domain/livechat/php/app.php?widget-init.js&_lang=zh"></script>Adding more avatars
In addition to uploading custom avatars, a predefined set of avatar images is available that both guest and operators can easily use. If you would like to modify the images available as predefined avatars, you just need to modify the contents of the
upload/default-avatarsdirectory. The application automatically iterates through all the avatars from this folder and makes them available in the chat.Adding more sounds
New message notification sounds played when new messages arrive can be found in
audiodirectory. If you would like to use additional sounds for this purpose, just copy the MP3 files to this directory. The application will automatically load all of the new files and enable you to choose one of them usingNew message sounddrop-down menu in admin's panelSettingstab.JavaScript API
The widget exposes a JavaScript API to the page that contains it. This way you can interact with the widget using you own JavaScript code. The API can be accessed via the
phpLiveChatglobal object.Important: your custom JavaScript code has to be placed after the widget embedding script - otherwise, phpLiveChat global object will not be accessible.
Here is an example code presenting all of the available features:
// Show the widget phpLiveChat.show(); // Turn on the full-screen mode phpLiveChat.fullscreenOn(); // Turn off the full-screen mode phpLiveChat.fullscreenOff(); // Hide the widget phpLiveChat.hide(); // End the chat phpLiveChat.endChat(); // Send a message to operator phpLiveChat.sendMessage('Hello! :)'); // Execute custom code when operators are online phpLiveChat.onoperatorsonline = function() { alert('Operators are online'); }; // Execute custom code when operators are offline phpLiveChat.onoperatorsoffline = function() { alert('Operators are offline'); }; // Execute custom code when new message is received phpLiveChat.onmessage = function() { alert('New message just arrived'); }; // Execute custom code when a visitor logs into the chat phpLiveChat.onloginsuccess = function() { alert('Visitor started the chat'); }; // Execute custom code when a visitor ends the chat phpLiveChat.onlogoutsuccess = function() { alert('Visitor finished the chat'); }; // Execute custom code when operator is typing phpLiveChat.onoperatortyping = function() { alert('Operator is typing right now'); }; -